Thursday, July 23, 2009

Thursday - Colors

THURSDAY - COLORS

Today is COLORS day.

We are making a dinosaur today. My 3yr old loves to color. She'll color her fingernails, the tips of her fingers, her arms, her feet, oh, and eventually the paper!

We are using:
  • neon yellow poster board
  • washable markers
  • crayons
  • star stickers
  • googly eye
  • dinosaur template
  • scissors
  • fastener

I found a dinosaur in a book and copied it onto paper, to cut out our dinosaur template. The dinosaur has a body and two separate legs, which will be attached later once we have finished decorating it. Google dinosaurs - there are heaps of images out there to copy! Or go to your local library - it would be a cool idea to also get out a dinosaur book to read together too!


Dinosaurs can be any color you wish! Explore the colors together - point out the colors your child is using. The more exposure to words and their association, the quicker kids pick up on them. My 3yr old knows a lot of colors. We talk about them, point them out, and ask "what color is that" everyday. I even do it with my 1yr old, who also loves to draw. They are never too young to start learning.

Once I had all the pieces cut out it was onto the fun part - decorating. We used washable pens (the washable part is a must for toddlers - I know mine gets pen everywhere), crayons, stickers and a googly eye.


Once completed, I put our dinosaur together. I did mine with wire and buttons, but then also bought fasteners (got mine from Hobby Lobby) and these worked much better (easier & quicker).


What a good looking dinosaur! Have fun!

Tuesday, July 21, 2009

Wednesday - Concentration

WEDNESDAY - CONCENTRATION

Today is CONCENTRATION day. Ha, try to get a toddler to concentrate on anything for more than 5 minutes and you have a miracle, right? I guess you just need to pick the right activity, one which is interesting enough to capture their attention, and challenging enough to keep them occupied for a little bit of time.

So today we are doing a little obstacle course. You can stick down a line (maybe with duct tape), do it on tiles, or (like me) use books or other objects.

Firstly, I am using the books (spacing them out) so she can walk in between them. We do a regular-walk-in-between-all-the-books walk, then running, then on tiptoes! Then all my 3yr old wanted to do was walk on them (like stepping stones).


So next we changed it to objects to walk around, run around, chase around - it was fun!


Next, we tried a "balance beam" routine along the carpet seam/edge. My 3yr old is currently doing a gymnastics class at the local recreational center, and LOVES it! They've done the uneven bars and balance beam so far, plus hopping and a somersault roll.


It takes concentration to balance on the "beam", and walk on tiptoes, and, of course, to keep running through the object when you are being chased by your Mommy! Have fun!
Monday, July 20, 2009

Tuesday - Reading

TUESDAY - READING

Today is READING day. My 3yr old loves to read and we read a lot! During the day we take reading breaks, in the afternoon she has quiet time on her bed with a pile of books (naps went out the window about 3 months ago!), and there is also the classic must-have-or-I-won't-go-to-sleep 2 books before bedtime.

As part of the reading experience we learn about shapes and colors and sizes and LETTERS! The first letter she recognized (all by herself!) was G (first initial of her name). Now she is proficient at writing a G, and has also moved onto other letters.

So today we have some alphabet cards to look at and copy the letters, in a relaxed "just drawing a picture" kind of way. No pressure works best for us. As soon as she loses interest we move onto something else, or just allow her the freedom to explore what we were doing further, by herself. I give the directions and freedom for her to take forward at her own pace.

My sister sent us this beautiful box of alphabet cards from Corban & Blair - very cute! You can do this with a book or just by writing out the letters yourself and getting your little one to copy them. Explain the letter, think of words starting with that letter and show pictures of the object too. The more exposure you give little ones to words, letter and reading the quicker they pick it up and become interested in it.

We sit at our little table with the cards, some paper and a pen (her preferred medium!), and away we go.


First letter is "G" (no surprise there - her favorite letter!)


Now some freedom to draw out the "G" just however she wants to. Oh, squiggly lines - pretty.


Next is a capital "I" - wow - great job!


She even did a little "i".


Some more drawing.


And that one top left is an "F"...a very tall "F". Oh, and another "G" - this time on the hand.


Not a bad effort for a 3yr old?


Every kid learns at their own pace - have patience and perserverance, and in time your efforts will be rewarded. And remember to have fun!

Monday - Shapes

MONDAY - SHAPES

Today is SHAPE day.

We enjoyed some cooler weather this morning (from our normal 100+ days here in Texas) so we were outside gardening. My 3yr old loves to be outside looking at all the plants and flowers, and chasing after the butterflies and lizards, so I thought this would be a good theme for our SHAPES project.

So today we are constructing a garden picture.

We are using:
  • leaves from the tree as stencils
  • paint (washable finger paint)
  • foam paintbrushes (one round and one rectangle/angled)
  • some large floor pad sized paper (Crayola Floor Pad which I bought from WalMart)
  • and some pretty craft paper for some butterflies (I found these on Martha Stewart's website - just search for paper butterflies or copy and paste the following - http://www.marthastewart.com/good-things/party-idea-wing-it?autonomy_kw=paper%20butterflies&rsc=header_6)

Outside we pick off a few leaves from our beautiful tree.


We get our page from the floor pad and set up on our table, ready for us to construct and paint our garden picture.


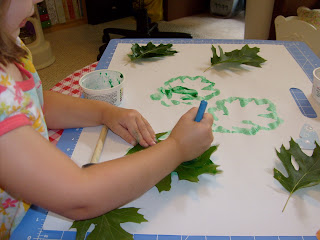
We have our leaves and a couple of butterflies to stick onto our page. We are also using the leaves as stencils - to paint an outline of the leaves on the paper. This is fun to do with some washable finger paint and foam brushes. We are using a small round brush and a rectangular/angled brush.


Arranging our leaves.


Dab the paint around the outside of the leaf. My 3 yr old was more interested in just painting the leaf, which works too! So we did a bit of both. We taped the painted leaves onto the paper at the stems and at the tip of the leaf, so it still had a 3-D effect.


We used two colors - green and orange - nice summer colors!


I recycle my yogurt tubs to use as paint containers - just the right size for little fingers and enough paint. (Actually I keep a lot of "trash" to use - especially formula tins, oatmeal containers, cereal boxes for the cardboard, etc - before you throw something out think if you can use it in a craft project!)

Here's a butterfly. I love these butterflies from Martha Stewart's website. I also cut out heaps of them to decorate for my 3yr old's birthday - they were on the balloons, the flower vase, the window, and even one on her chair. She loved them. They are so easy to make, and so cute!


And here it is - the masterpiece. Our wonderful garden picture with fantastic shapes in it. Whilst we were making our picture we talked about the shapes we were painting - like the leaves, and the circles, and the butterflies. You can move beyond the basic shapes (circle, triangle, etc) and teach your kids there are many different shapes out there to discover!


Love it - now all she wants to do is show her beautiful picture to her Daddy! Have fun!

Weekly Bus Schedule

Bus Schedule - Week 4


Monday - Shapes

Tuesday - Reading

Wednesday - Concentration

Thursday - Colors

Friday - Days, Months

Have a great week!

Monday, July 13, 2009

Wednesday - Communication

WEDNESDAY - COMMUNICATION

Today is COMMUNICATION day.

I'm spending some quality one-on-one time with my 1 year old today. We are relaxing on the playroom floor together, clapping hands and playing peek-a-boo.


Our wonderful lawn care people arrived, so it's off to the window to observe, communicate what we see and, of course, wave hello!


These little things - clapping, waving, playing peek-a-boo - are all important communication skills for babies. We have communicated an action to our child, then they learn to copy it and use it at an appropriate time (waving bye-bye to Daddy in the mornings as he goes off to work).

Clapping hands to music is a great way for kids to formulate a response to an outside stimuli - they hear the music, listen to the beat and clap. Eventually they will learn to clap to the beat of the music, or, if not so musically inclined, close to it! :)

Clapping in response to something great they did (like eat all their dinner) expresses to them an appreciation of their completed task, and kids love to be appreciated, and see and hear your approval of them! Clapping also provides good hand/eye coordination.

During our play on the floor we played peek-a-boo. My baby loves this game and plays it often. She is at the point now where she does it herself, and knows it always gets a good (laughing) response from us. Anytime I say "Where's baby?" she will start to play peek-a-boo, with a towel, blanket or even just her hands. So cute, lots of fun, and a great communication tool.

In the last few weeks she has also started waving. For the longest time she would just observe us showing her how, but not even try to copy it. Then one day, out-of-the-blue, she did it, and hasn't stopped since. Babies will develop at their own pace - she was just waiting until she had it down-pat, and could cue it up perfectly (waving at Daddy going to work!).

Sometimes it is hard to have one-on-one time with my baby with my 3yr old always wanting in on the action, but it is important to establish this special time for each child to show them how important they are to me. And it is so much fun for me too! Have fun!

Tuesday - Kindness

TUESDAY - KINDNESS

Today is KINDNESS day.

With little one's birthday in just two days I thought this would be a good time to get started on our "Thank You" cards, to thank everyone for their beautiful presents.

I have some store-bought "thank you" cards that I am going to use, but we are going to decorate and personalize them.


Firstly, we need a picture of the birthday girl to put into our card. I am taking photos of her out by the pretty yellow lantana.


While we were out there we were lucky enough to observe a beautiful butterfly! If you can encourage your toddler to sit quietly for long enough it is cool to observe all sorts of things in the garden (butterflies, ants, lizards, birds or maybe even a squirrel).


Once we have our photos printed we will stick them on the inside of our card. With a little help my (soon-to-be) 3yr old wrote "thanks" inside, and an "x" & "o" all by herself! I will address the cards to the individual gift-bearers and write the envelopes too.


During the whole process I explained to my little one what we were doing and why it is important to do. This gives them an extra appreciation for their presents and shows them how to express kindness, and special thanks for their gifts.

Only two more sleeps until the big day, and still so much to do! The main thing is to enjoy it, so we make our birthdays just a family affair, to lessen the stress and put the focus on the kids and our family. Everyone has a great time - we love birthdays! Whatever way you celebrate always remember to have fun!


“It is more blessed to give than to receive.”

— Jesus, in Acts 20:35